
A chat bot with buttons: step-by-step guide
Building a bot from scratch in the scenario editor: a greeting with buttons, branches on the client reply, collecting a phone number, hand-off to a manager, testing and publishing.
A chat bot in AISAR is a scenario in the "Automation" section. A scenario starts on an event (for example, a client writes on WhatsApp) and runs steps: sends messages with buttons, waits for a reply, asks questions, assigns a manager. In this guide we build a menu bot for a studio: the client writes, the bot greets them and offers three buttons: "Prices", "Book" and "Manager".
What you need
- A connected channel: WhatsApp, WhatsApp Business, Telegram, Instagram or another one. The channel settings must have "Allow automations" turned on, otherwise the scenario cannot reply in it.
- Access to the "Automation" section with the right to create and edit scenarios.
- A test contact: your own second number or a colleague account, to check the bot before publishing.
Step 1. Create a scenario
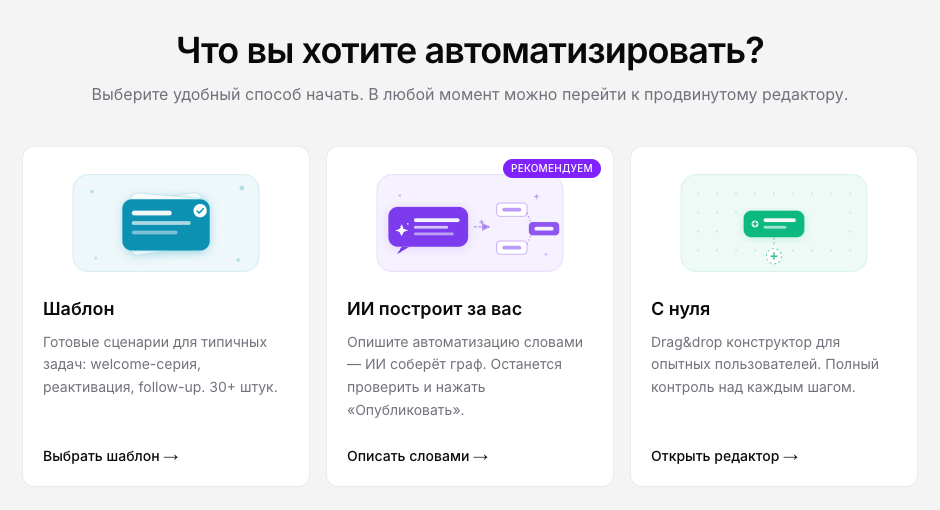
Open "Automation" and click "Create". There are three ways to start: a ready-made template, a description in words ("AI builds it for you") or an empty editor ("From scratch"). Here we build from scratch: click "Open editor".
The "Automation builder" opens: a canvas with the "Trigger" block. At the top are the "Editor", "Rules" and "Executions" tabs, on the right the "Draft / Published" switch and the "Save" button. Save as you go: a draft sends nothing to clients.
Step 2. Set up the trigger
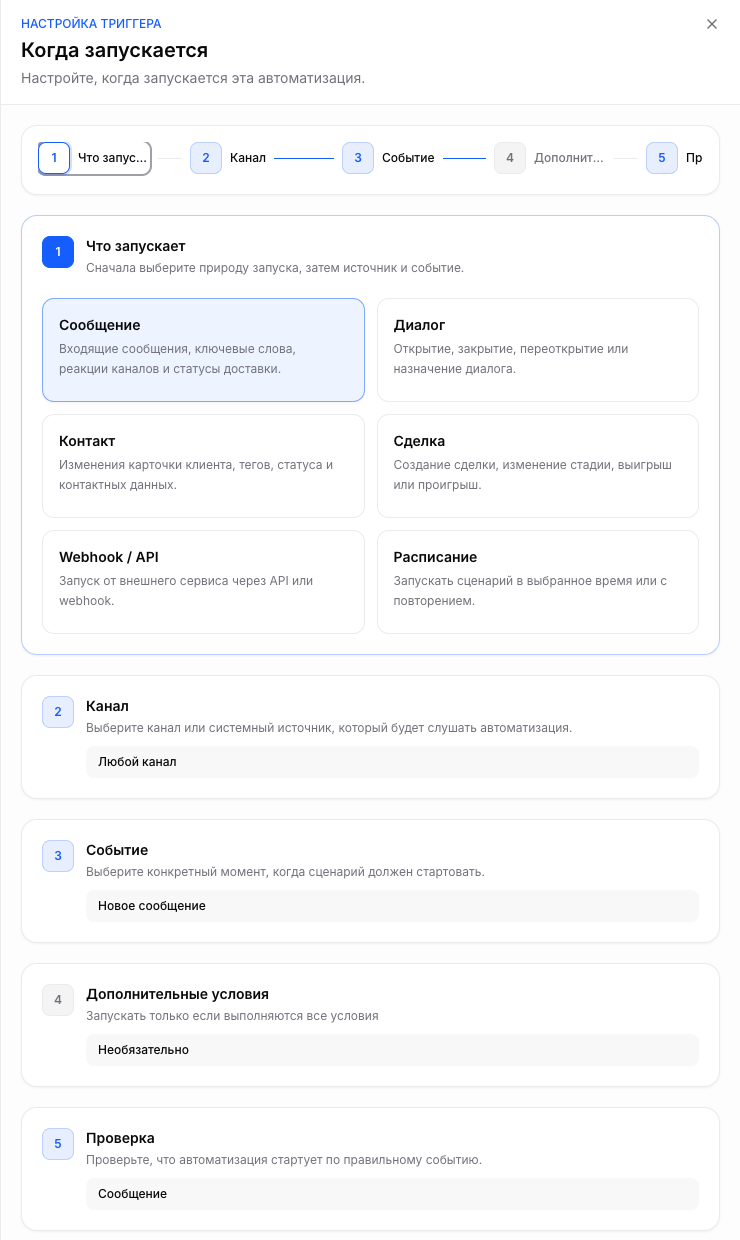
The trigger decides when the bot starts. Click the "Trigger" block, then "+ New Trigger", and go through five items:
- What triggers it: choose "Message".
- Channel: choose the channel the bot works in, for example your WhatsApp. "Any channel" fits only if all your channels are one messenger (see the tip below).
- Event: "New message".
- Additional conditions: optional. For example, start the bot only on a message containing the word "menu".
- Check: review the summary and click "Done".
Step 3. A greeting with buttons
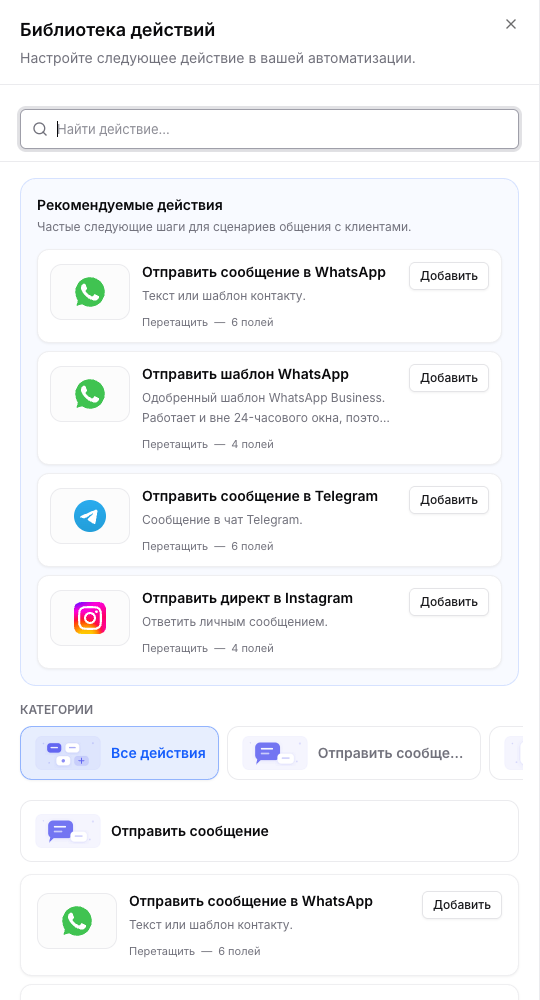
Click "Add action". The "Action library" opens: recommended steps at the top, below them categories ("Send message", "Contacts and deals", "Wait", "Branch" and others) and a search. Find "Send WhatsApp message" (or the block of your messenger) and click "Add".
Blocks have to be linked. Each block has an exit dot on the right and an entry dot on the left. Hold the right dot of the trigger and drag a line to the left dot of the new block.
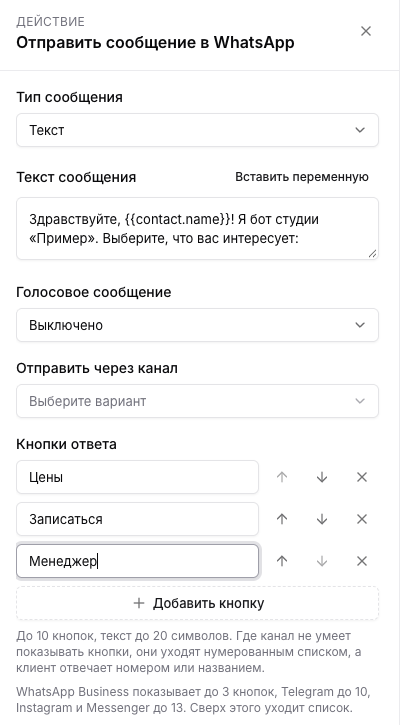
Double-click the message block to open its settings on the right:
- Message type: "Text".
- Message text: the greeting. The
{{contact.name}}variable inserts the client name: the easiest way is the "Insert variable" button. - Send through channel: leave it empty, the bot replies in the channel the message came from.
- Reply buttons: click "Add button" three times and label them "Prices", "Book", "Manager". Arrows change the order.
| Channel | How the client sees the buttons |
|---|---|
| WhatsApp Business | As buttons, up to 3, label up to 20 characters. |
| Telegram Bot | As buttons under the message, up to 10. |
| Instagram, Messenger | As quick reply buttons, up to 13, label up to 20 characters. |
| Other channels and over the limit | As a numbered list. The client replies with the number or the option name, the bot understands both. |
Step 4. Branches by the button pressed
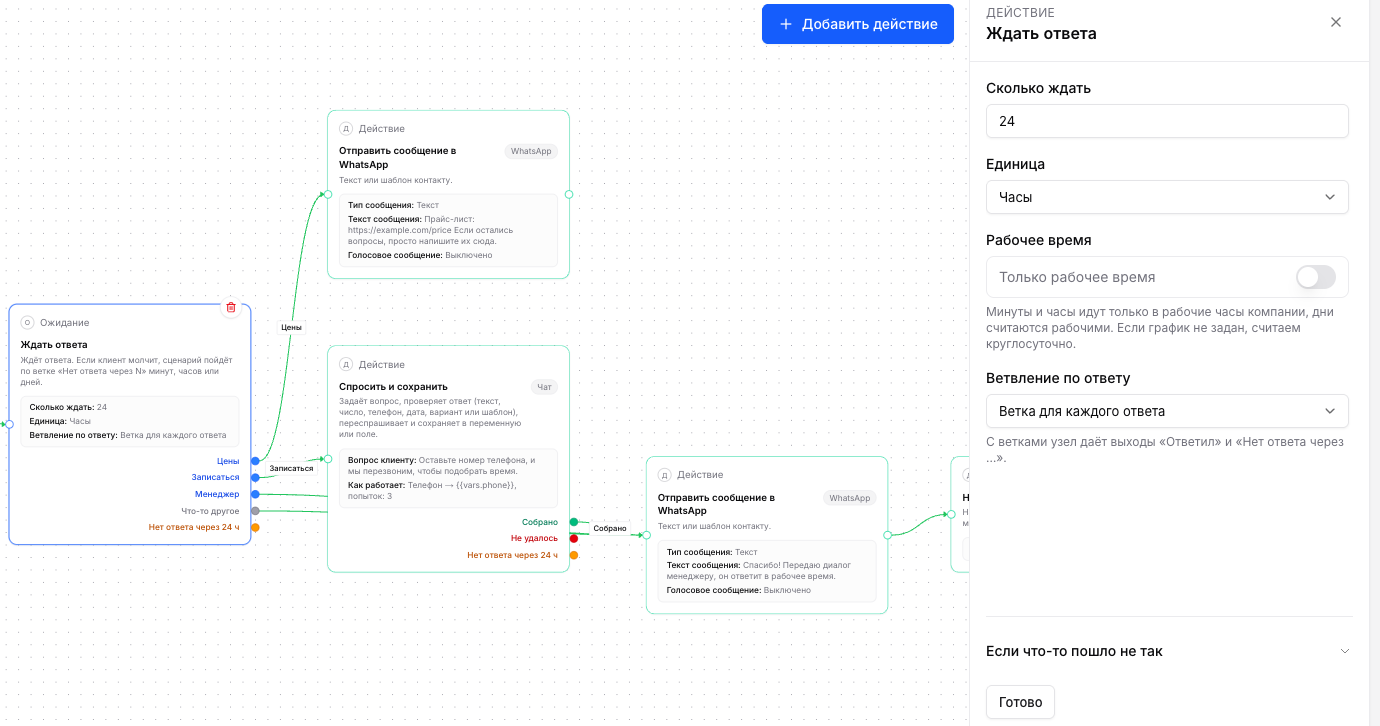
The message with buttons does not branch by itself: the next block does. Drag a line from the message block onto an empty spot and choose "Wait for reply" (the "Wait" category). In its settings:
- Timeout and Unit: how long the bot waits for a tap, for example 24 hours.
- Working hours: when on, hours count only during the company working time.
- Branch by the reply: choose "Branch by reply".
The block gets exits: one per button ("Prices", "Book", "Manager"), "Anything else" (the client typed text instead of tapping) and "No answer after 24 h" (the client stayed silent).
Step 5. What each branch does
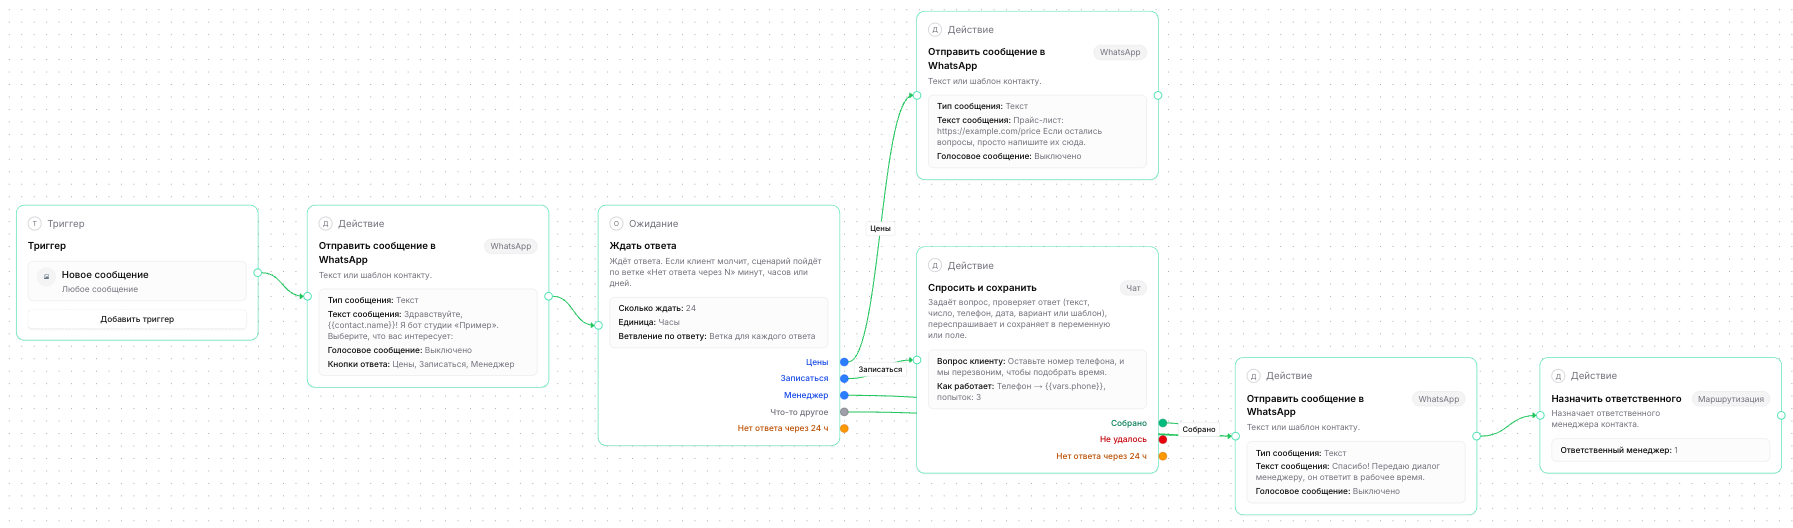
Lead each exit to its own blocks. In our example:
- "Prices": one more "Send message" with a link to the price list.
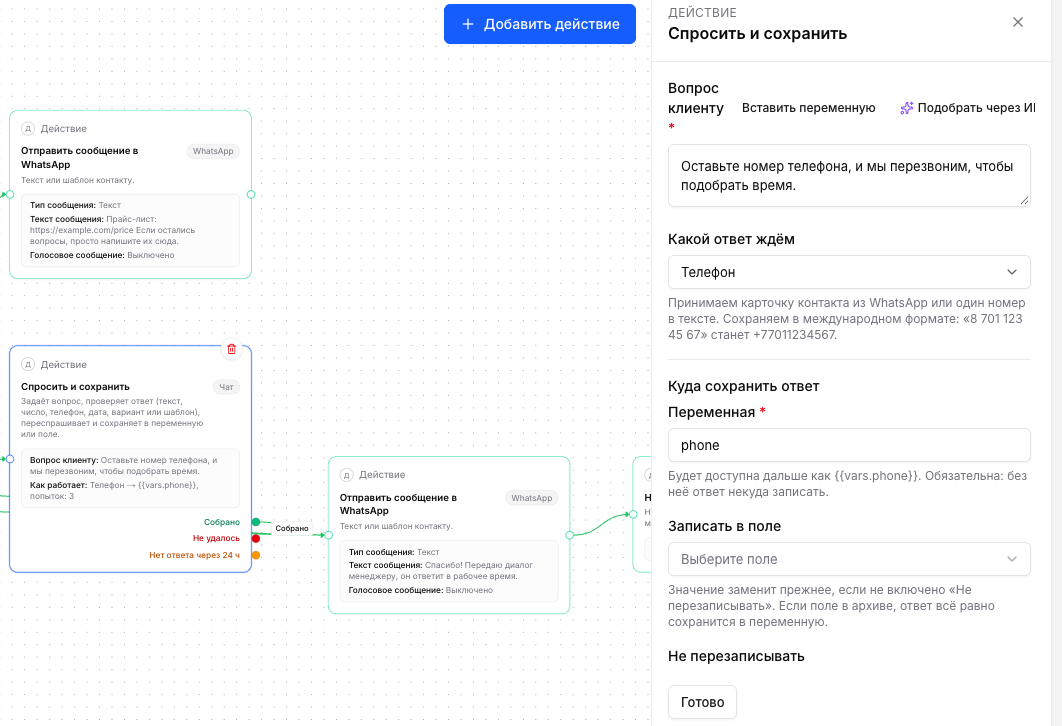
- "Book": the "Ask and save" block: the bot asks for a phone number, checks the answer and asks again on a mistake.
- "Manager" and "Anything else": a "Handing you over to a manager" message, then "Assign owner".
In the "Ask and save" block enter the question, set "What answer to expect" to "Phone" and "Variable" to a name, for example phone. The answer is then available as {{vars.phone}}; it can also be written to a client card field. The block has three exits: "Collected", "Failed" (attempts ran out) and "No answer after …". No separate "Wait for reply" is needed after it.
The complete bot layout:
Step 6. How often the bot greets a client
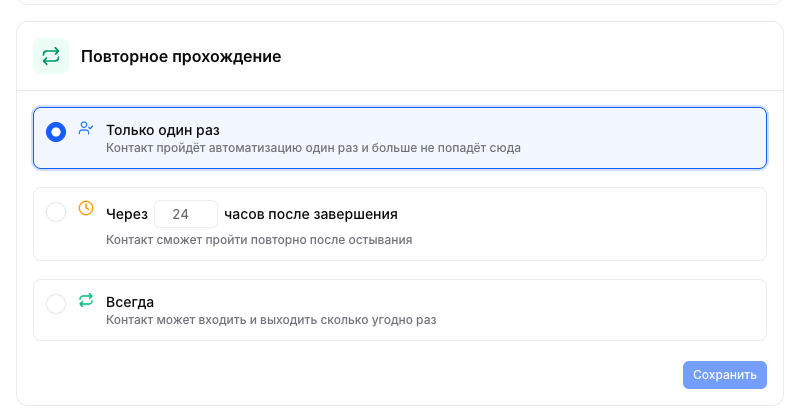
Open the "Rules" tab, the "Re-entry policy" block. The default is "Only once": each client goes through the bot once ever, and the bot no longer answers their later messages. For a menu bot "After N hours after completion" usually fits, for example 24: the menu shows again when the client comes back the next day. "Always on" shows the menu on every message after the scenario ends, which gets in the way of a live chat with a manager.
The same tab shows "Quiet hours" and "Frequency cap": they come from the company settings and protect clients from night-time messages and overload. More: Automations: everyday scenarios.
Step 7. Test the bot
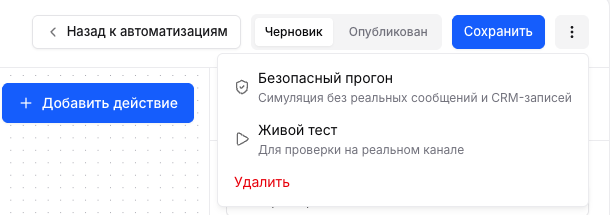
Save the scenario and open the "Actions" menu (three dots next to "Save"):
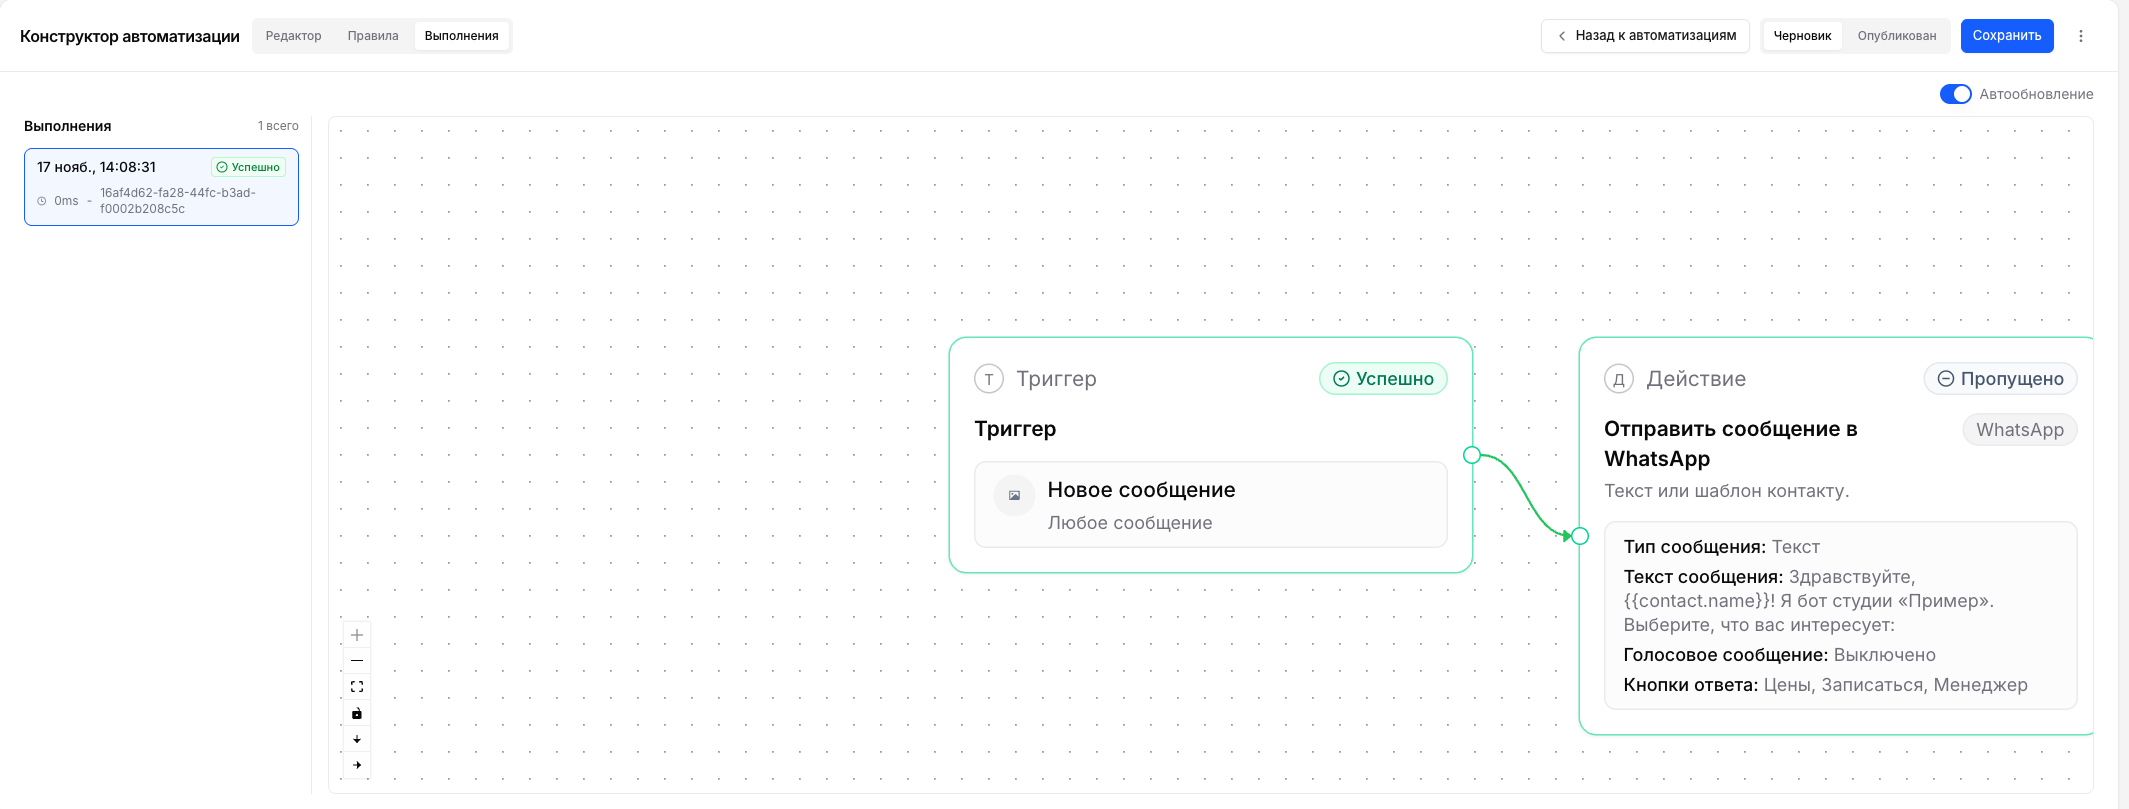
- "Safe dry run": a simulation with no real messages or CRM records. Good for checking the scenario is assembled without errors. Sending steps in such a run are marked "Skipped", questions are not sent.
- "Live Test": a real run: choose a channel and a contact and confirm with the checkbox. Messages are really sent, so use a test contact only.
See the result on the "Executions" tab: the list of runs on the left, the layout on the right with a status on each step: "Success", "Skipped", "Error".
Step 8. Publish
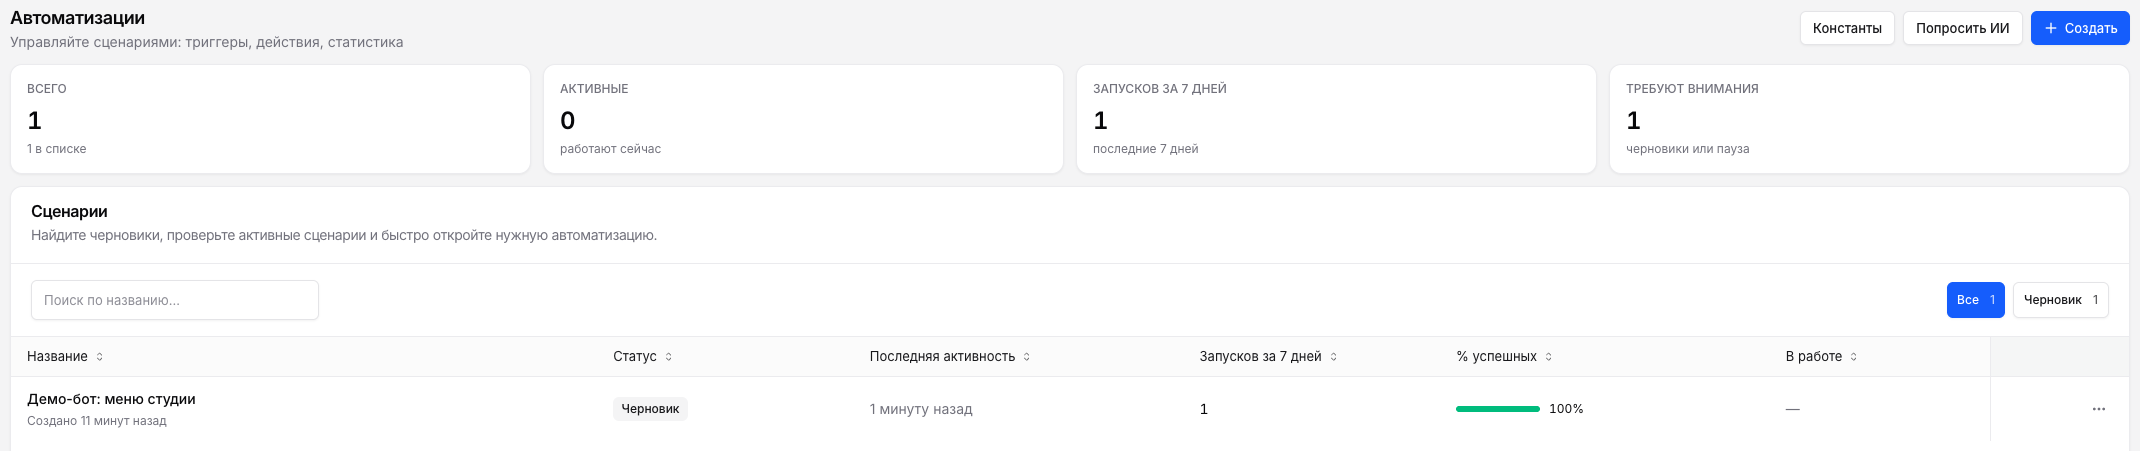
Switch "Draft" to "Published" and click "Save". From that moment the bot answers clients. The "Automation" list shows the status of each scenario, runs over 7 days and the share of successful ones. To turn the bot off for a while, pause it: clients already inside the scenario finish it, new ones do not enter.
If the bot misbehaves
| What happens | What to check |
|---|---|
| The bot does not answer at all | Is the scenario published? Is the trigger linked to the first block? Is "Allow automations" on in the channel settings? |
| Answered once, then silent | The "Rules" tab has "Only once". Choose "After N hours after completion". |
| The buttons came as a numbered list | The channel does not show buttons, there are more buttons than the limit or a label is longer than 20 characters. The client can still reply with the number or the name. |
| The client replied with text, the bot is silent | No line is attached to the "Anything else" exit. |
| The reply went to the wrong messenger | The send block does not match the client channel. Pick a concrete channel in the trigger and a block of the same messenger. |
| There is a run, but a step was skipped | Open the step on the "Executions" tab: the reason is shown there, for example "Quiet hours" or the frequency cap. |
What next
- Variables, constants and buttons in scenarios: placeholders in texts, all "Ask and save" answer types, buttons in WhatsApp templates.
- CRM blocks in scenarios: find a contact or a deal and change the stage right from the bot.
- Starting a scenario by a webhook: a bot that writes first on a website request.